


But don’t let that one killer feature get away. Even if you consider yourself an Android power user, you’d do well to make sure you’re familiar with every single menu, toggle and utility on this list. We’ve done our best to identify the precise locations of the features listed below, but you may have to hunt around menus a bit if your device manufacturer has excessive interface customization's.
The Google Play Services framework is used to manage all sorts of back-end services, and Google updates it frequently in the background. Most of the functionality packed away in this framework is of little user-facing consequence, but there’s a lot including account sync, malware scanning, and the Android Device Manager. This feature allows you track, ring, lock, and wipe your device if you lose track of it.
By default, you can only ring and locate a device with Android Device Manager, so if you want the full gamut of features, go into your main system settings and scroll down to Security. Find the Device Administrators option, and open it to see what apps have been granted admin privileges on your phone or tablet. Checking the box next to Android Device Manager allows you to wipe and lock the device in addition to the ring and locate features.
You can remotely access Android Device Manager in a number of useful ways. If you only have one Android device, you can use any web browser to go to the Android Device Manager page and log into your account. From there, you can see a map of where your phone is located, and issue commands to nuke it or just lock it.
Before resorting to extreme measures, you might want to start with locating and making it ring to ensure it didn’t just slip between the couch cushions. Should you have access to more than one Android device, you can use the Android Device Manager app, which you can keep on all your devices to locate and manage the others.

Activating developer options
Android devices are faster than they used to be, but you can make your experience feel even faster with one simple tweak. Android contains a hidden developer options menu that you can enable by going into your main system settings, then navigating to About > Software Information > More > Build number (shown in below picture). Now tap on the build number 3 or 4 times until a small message at the bottom of the screen confirms that you’re a developer.its called activating developer mode.
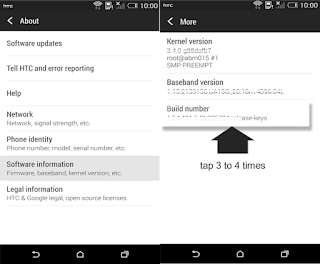

Now, don’t worry: This doesn’t make any modifications to your system. It just turns on the Developer Options menu back in the main settings list—so head back there and open it up. Developer Options has a ton of interesting features to play around with, but you can also mess things up pretty badly, so it’s best not to change anything you haven’t thoroughly researched. You’ve been warned!
Now back to animations. Inside Developer options, scroll down to Drawing and find Window animation scale, Transition animation scale, and Animator duration scale. These are all set to 1x by default. These animations are the eye candy you see when apps open and close, menus drop down, and more. They help cover up lag as the system catches up, but you don’t really need slow settings on a fast device. You can set all of these to 0.5x for a more snappy interface experience.
 Smart Lock Feature for easy unlocking
Keeping your phone secure is important, but if you’re the one holding it, there’s no reason you have to deal with a strong lock screen every single time you drag it from your pocket. Luckily, Android 5.0 devices now have support for Smart Lock. This feature can display the easy swipe lock screen when it’s safe to do so. How does it know? Well, there are a variety of options, some more secure than others.
Smart Lock is delivered to devices via Play Services, just like Android Device Manager. The locking options will vary by device, but Nexus phones and tablets have the most. There’s Trusted Face, Trusted Location, Trusted Devices, and on-body detection. At the bare minimum, all devices should have Trusted Devices and Trusted Location.
So for example, you can have your phone set to swipe unlock at home, but take a stroll down the block or hop in the car and it will start asking for the pattern, PIN, or password lock again. The same goes for Trusted Devices—if you’re connected to a Bluetooth or NFC device you have previously marked as “trusted,” (like your car or Android Wear watch) you’ll see no secure lock screen. With Trusted Face, the device will switch seamlessly transition to swipe unlock mode if it spots you with the front camera. On-body detection is a little weird—this option keeps your phone set to swipe unlock as long as it detects it is still in your hand or pocket. Set it down, and it locks again.
Keep in mind, some OEMs really bury the Smart Lock menu a few levels deep in advanced security or privacy settings. You may also need to enable Google Play Services as a “trust agent” in the settings of some device to access Smart Lock.
 Controlling Data usage settings
We all are tired of data plans and ever-increasing carrier fees. And always need to check your data plan remaining MB .Android has a built-in tool that helps you do this, but most users don’t use it to its full potential. The Data Usage menu is usually near the top of your system settings list (though it may be buried under a “More” heading), and can also be accessed via the network signal strength icon in Quick Settings(In Samsung devices it can be seen in settings menu) You can use the sliders on the usage chart to set your data limits for your chosen billing cycle.
The default behavior is simply to warn you when you reach your data limit. However, by the time you get that warning, it’s often too late to adjust your behavior and avoid overage charges or automatic throttling. A better use of the data tracking feature is to set your warning a few hundred megabytes below your limit, then enable a data limit with the checkbox right above the chart. The red line on the chart lets you set a point at which your mobile data will be shut off.
 Wi-Fi Direct for quick file transfers
Transferring files between devices has always been a little annoying, but Apps like Zapya , Xsender made it easier:you just open the same app on both devices and create a group on one phone other needs to join in that group to share files . It’s a neat trick, but without the same App it cant be done. And file type support is limited in some Apps. Luckily, however, most Android devices support Wi-Fi Direct, even though Google’s stock apps don’t make use of it.
Wi-Fi Direct is exactly what it sounds like: a protocol that can create a direct connection between two devices via Wi-Fi. You just need an app to make use of it, and there are several in Google Play. SuperBeam is probably the most powerful, and it has a free version. To get a transfer going, you just share files to Super Beam (or whatever app you’ve chosen to use) and tap phones. Wi-Fi Direct allows you to queue up multiple files in a single operation and the transfer rate can easily exceed 30 Mbps. It’s fabulous for sharing large videos or images.
Best file managers that included Wi-Fi
http://www.appglaze.com/2016/03/best-user-friendly-file-managers-for.html
http://www.appglaze.com/2016/03/best-user-friendly-file-managers-for.html

Restrict background data, app by app
Because Android allows apps to wake up in the background and perform activities, there’s always the possibility they’ll send and receive mobile data without your knowledge. When you’re on a low-capped data plan (or you’re just coming up on the cap) this can be an issue. Luckily, the Android Data Usage menu in your phone offers information on what’s using data in the background, and could save you from extra charges.
Below the graph of overall data usage mentioned above, you’ll find a list of all your apps organized by how much data they’ve used, starting with the most greedy offenders. Tap on any single app for details on the split between foreground and background data. If you find an app using a lot of bytes in the background, you can scroll down to the bottom of the details page and check the option to restrict background data. Note, however, that this option is only available on devices that hook into mobile data plans.
Also keep in mind that some apps won’t work as expected with this option enabled, so only use it for apps and services that aren’t respectful of your mobile data connection.

add Priority in App Notifications
Android 5.0 Lollipop added notifications to the lock screen, but that’s not the only change to Android’s traditional great notification system. You can use the priority notification system to hide content from the lock screen and control which apps can bother you and when. While awesome and powerful, this system is complicated to set up.
Notifications modes (sometimes called interruptions) on most Lollipop devices are split into all, priority, and none. None means you get no notifications, not even alarms. Priority mode allows alarms as well as whatever apps you’ve deemed important. Then there’s all, which is standard notification mode. In your Sound and notification settings, you can edit which apps have priority status, and allow priority exceptions for calls or text from certain numbers. You can switch the three interruption modes by hitting the volume toggle and tapping the None, Priority, or All indicators.
Once you get the interruptions configured, you can set up recurring interruption mode in the notification menu. This is a way to have the device toggle on none or priority mode on a schedule, for example each day at bedtime. On most devices this is called “downtime,” but sometimes it’s labeled “do not disturb.” These are very useful features, so it’s worth a few minutes of your life to set things up.
There are still uncovered hidden features for android users.Its hidden because these features maybe still improving/developing .
